 |
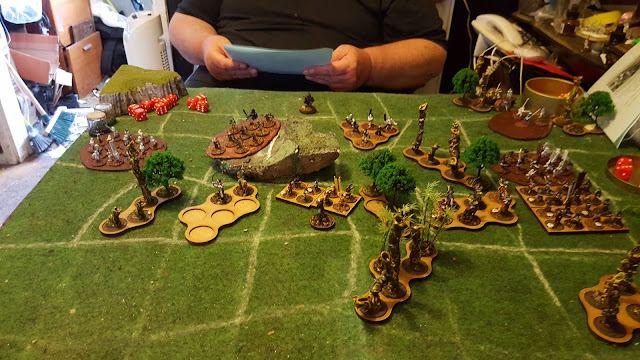
| New movement tray as per last article. |
Wow. You seem to
really like the stuff I'm putting out at the moment! Well, a lot of
you are reading it, I get a good few likes on the FB sites I post 'em.
At the moment I
can plot n play or paint. I'm trying to get the balance right, but
if I ain't playing there's no point in painting says the logical part
of my brain. But it also says that watching paint dry is better than
watching TV sans Big Bang & Young Sheldon.
So- the game. The
more astute observer, those that take my posts as a 2-pipe problem,
will note that I'm carrying over one side each time to save on work
and repacking. Sneaky, neh?
And I've done it
again, not a bit of paint betwix Sunday and Wednesday (but 3 blog
posts) For shame.
IF this was a campaign game then we'd be looking at disengaging once about a 1/3 had been lost. as it wasn't, we went on.
The Players
On the Samurai
side, the Tengu need more lives and/or more Tengu. These was taken
from one of our first games.
Samurai
Tengu Q3
A3 D5 Flying, Devastating charge 4 x 23 = 92
Samurai cavalry Q3 A2 D6,
Mounted, Fast, Shoot 3 @ 33 x 12 = 396
Samurai foot Q4 A3 D6 @ 19 x 16
= 128
Samurai archers Q4 A1 D6 Shoot
3 @ 8 x 25 = 200
Follower archers Q4 A1 D4 Shoot
2 @ 8 x 12 = 96
Follower Q4 A3 D4 @ 8 x 11 = 88
General Q3 A2 D6 General, Fast,
Shoot 3, extra 2 lives @ 65
Total 1,065
I thought my
Bakemono needed a wee tweek. Tried the heavy, armoured as a unit of
2. Not happy with that. I'll try as Q3 (so they go 2,3,4) and singles next time.
Plus I reduced the attack score of the rabble, added rabble, and
bumped 'em up to Q4. That was wrong, redo as Q5 for that uncertainty
factor. Quite pleased with the General.
Oni/Bakemono force
Dai Oni Chieftan
2 6 8 Giant L4, General, Exlives 4 85
Armoured Dai Oni 4 4 8 Giant L3 Tough
3xtra lives 2 x 90 = 180
Oni 4 4 6 Giant L2 Tough 2xtra lives
6x62 = 372
Lightly Armoured Bakemono 4 3 5
Devastating charge, 16 @ 16 = 252
Archers 4 2 4 Shoot 2 14 x 10 = 140
Unarmoured Bakemono 4 2 4 Devastating
charge, Rabble, 2x16 = 32 @ 7 = 224
Total 1,057
The game
Tony took the
Samurai and got the initiative – not that it mattered, we shuttled
initiative like a badmington game.
Set up. Long moving troops (cavalry & Tengu) set up 2 in, everyone else 1 square. Biggest difference betwix last week, the bases aren't colour coded. My 2 hordes take the end positions. I can see 4 such hordes guarding a built up area. That would be fun, must have a count--.
Tony's first moves, cavalry and Tengu coming on strong. I get one horde forward on reaction.
The cavalry get spooked by my archers and do a tactical retreat, but mine chase them (oh that could have gone so wrong!) and amazingly slapped 'em! If Tony had used cavalry and Tengu as "combined ops" that could have been quite different, attacking and slaughtering my archers would have had a quite different outcome. Six cavalry and Tengu combined, double unit occupying same area thus capable of charging together. Hmmmm.
Tengu take the high ground, so surprise there- does my General look worried?
The archers scramble up the rocks and slap the Tengu down!
Halved by archery, they make a lack luster charge and come off worse.
Horde comes up to plug the gap on reaction.
Archery takes its toll, then the cavalry charge.
I counter his Samurai with my mediums. I'm on 1 less in the combat (similar weapons, I've less armour) Tony charged me, so I couldn't claim devastating charge that would allow me to reroll any 2's. I'm thinking a similar, slightly more open, base for the Samurai would be good.
I won! If you can call it that! But they get shot by the cavalry. But I've destroyed the largest enemy unit, everything else is still way back.
On the other flank my other horde gets harassed.
Send in the heavies! They get hurt by the archery and fail to stomp the archers. The survivor is down to 1 life. As I'd put them in a unit, 1 isn't viable so he slopes off-.
Well didn't do too bad, considering this had been the most powerful enemy unit now the other Samurai's gone.
My unarmoured Oni dash into the rear of the cavalry, plus the remnant Samurai. To save confusion, different dice are used for this separate combat.
Crunch!
My Horde attempt to strike at the General and the remnant units.
Meanstwhile, the followers assault my archers on the outcrop. Amazingly I get good shooting results and wipe them out in the quick combat. These have taken out several times their value!
Follower archers eye up my Oni. These run when the General dies.
That leaves me with 1 horde and a general. Easy! The cavalry hit first, cause damage but die.
The archers go in next, taking out my General but perished in the process. My archers run.
That leaves my horde to hunt the General, but the archers prevail and that's it!
We were quite lazy, if we had got on with it, decided when I'd lost we could have half-time-change ends and had 2 hours to finish a second game. More tweeking, more hordes!


No comments:
Post a Comment